

CENOBOX MUSIC
Cenobox is a music player (for Mac)… and much more! If you like collecting digital music (mp3, flac, AAC, wav, aiff) and want to enjoy it with a simple and beautiful interface, this program is for you! It’s based on three goals:
- Managing your digital music collection quickly and efficiently. Add music and edit Title, Artist, Album, Genre, Year, Volume, Rating, Mood and Duration of your tracks. This info is also updated in the ID3 tags of the files. The music files are collected in a Cenobox folder that’s subdivided in artist folders (much like iTunes) but everything can be stored where you want and shared & synchronized with other people or computers.
- Listen to your music using a Playlist with upcoming music, based on Rating, Genre, Year, Mood, etc. Cenobox keeps track of when your songs where last played, so you never hear a track twice unless you manually select it. You can search and add tracks to the playlist and shuffle it while all music is mixed, even if you manually skip a song (unless you disable mixing). There’s also the possibility to make DJ Sets: a set of tracks you can prepare before and load up later on.
- Doing all this in an attractive way by using a screensaver with background pictures and a jukebox title strip showing the track’s Title, Artist, Year, Rating and Mood. The track’s cover art is also shown if it’s available and if it’s not, Cenobox will try to scrape it from the Discogs website. You can add your own background pictures and add background art for your favorite artists which are shown when the artist is playing.
To download: scroll down to the yellow part in the Manual.
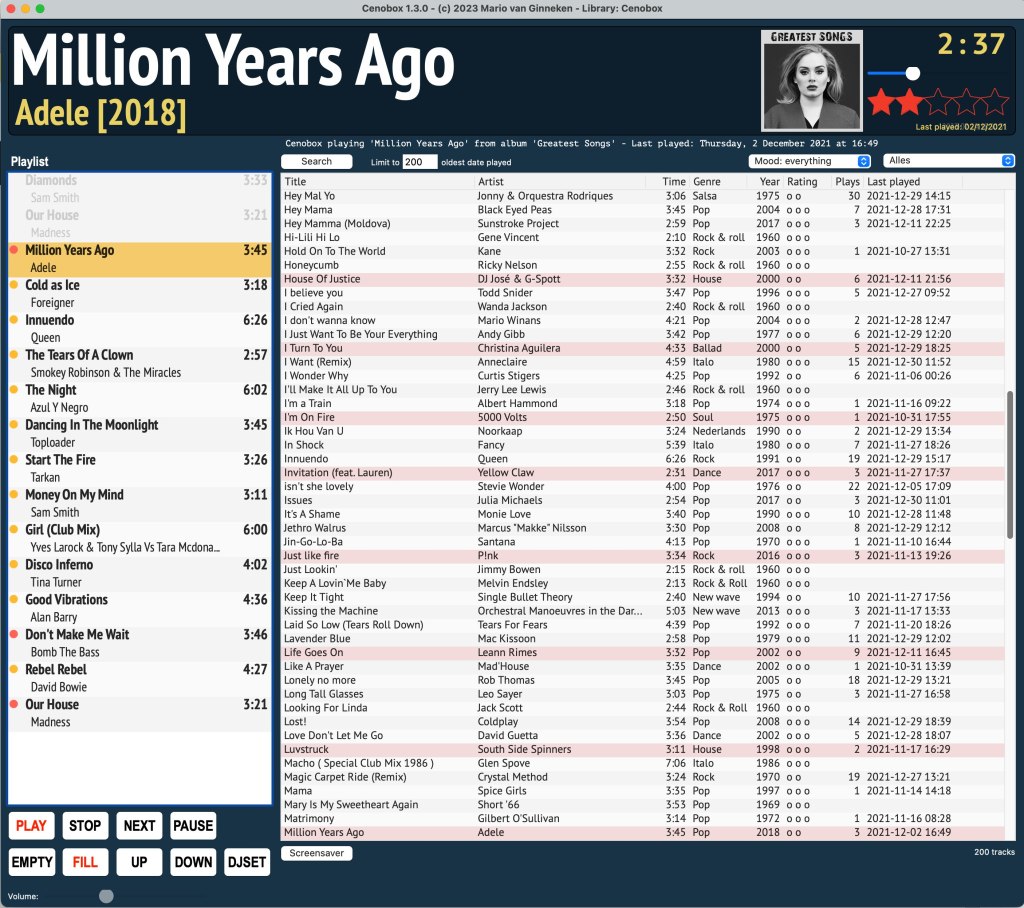
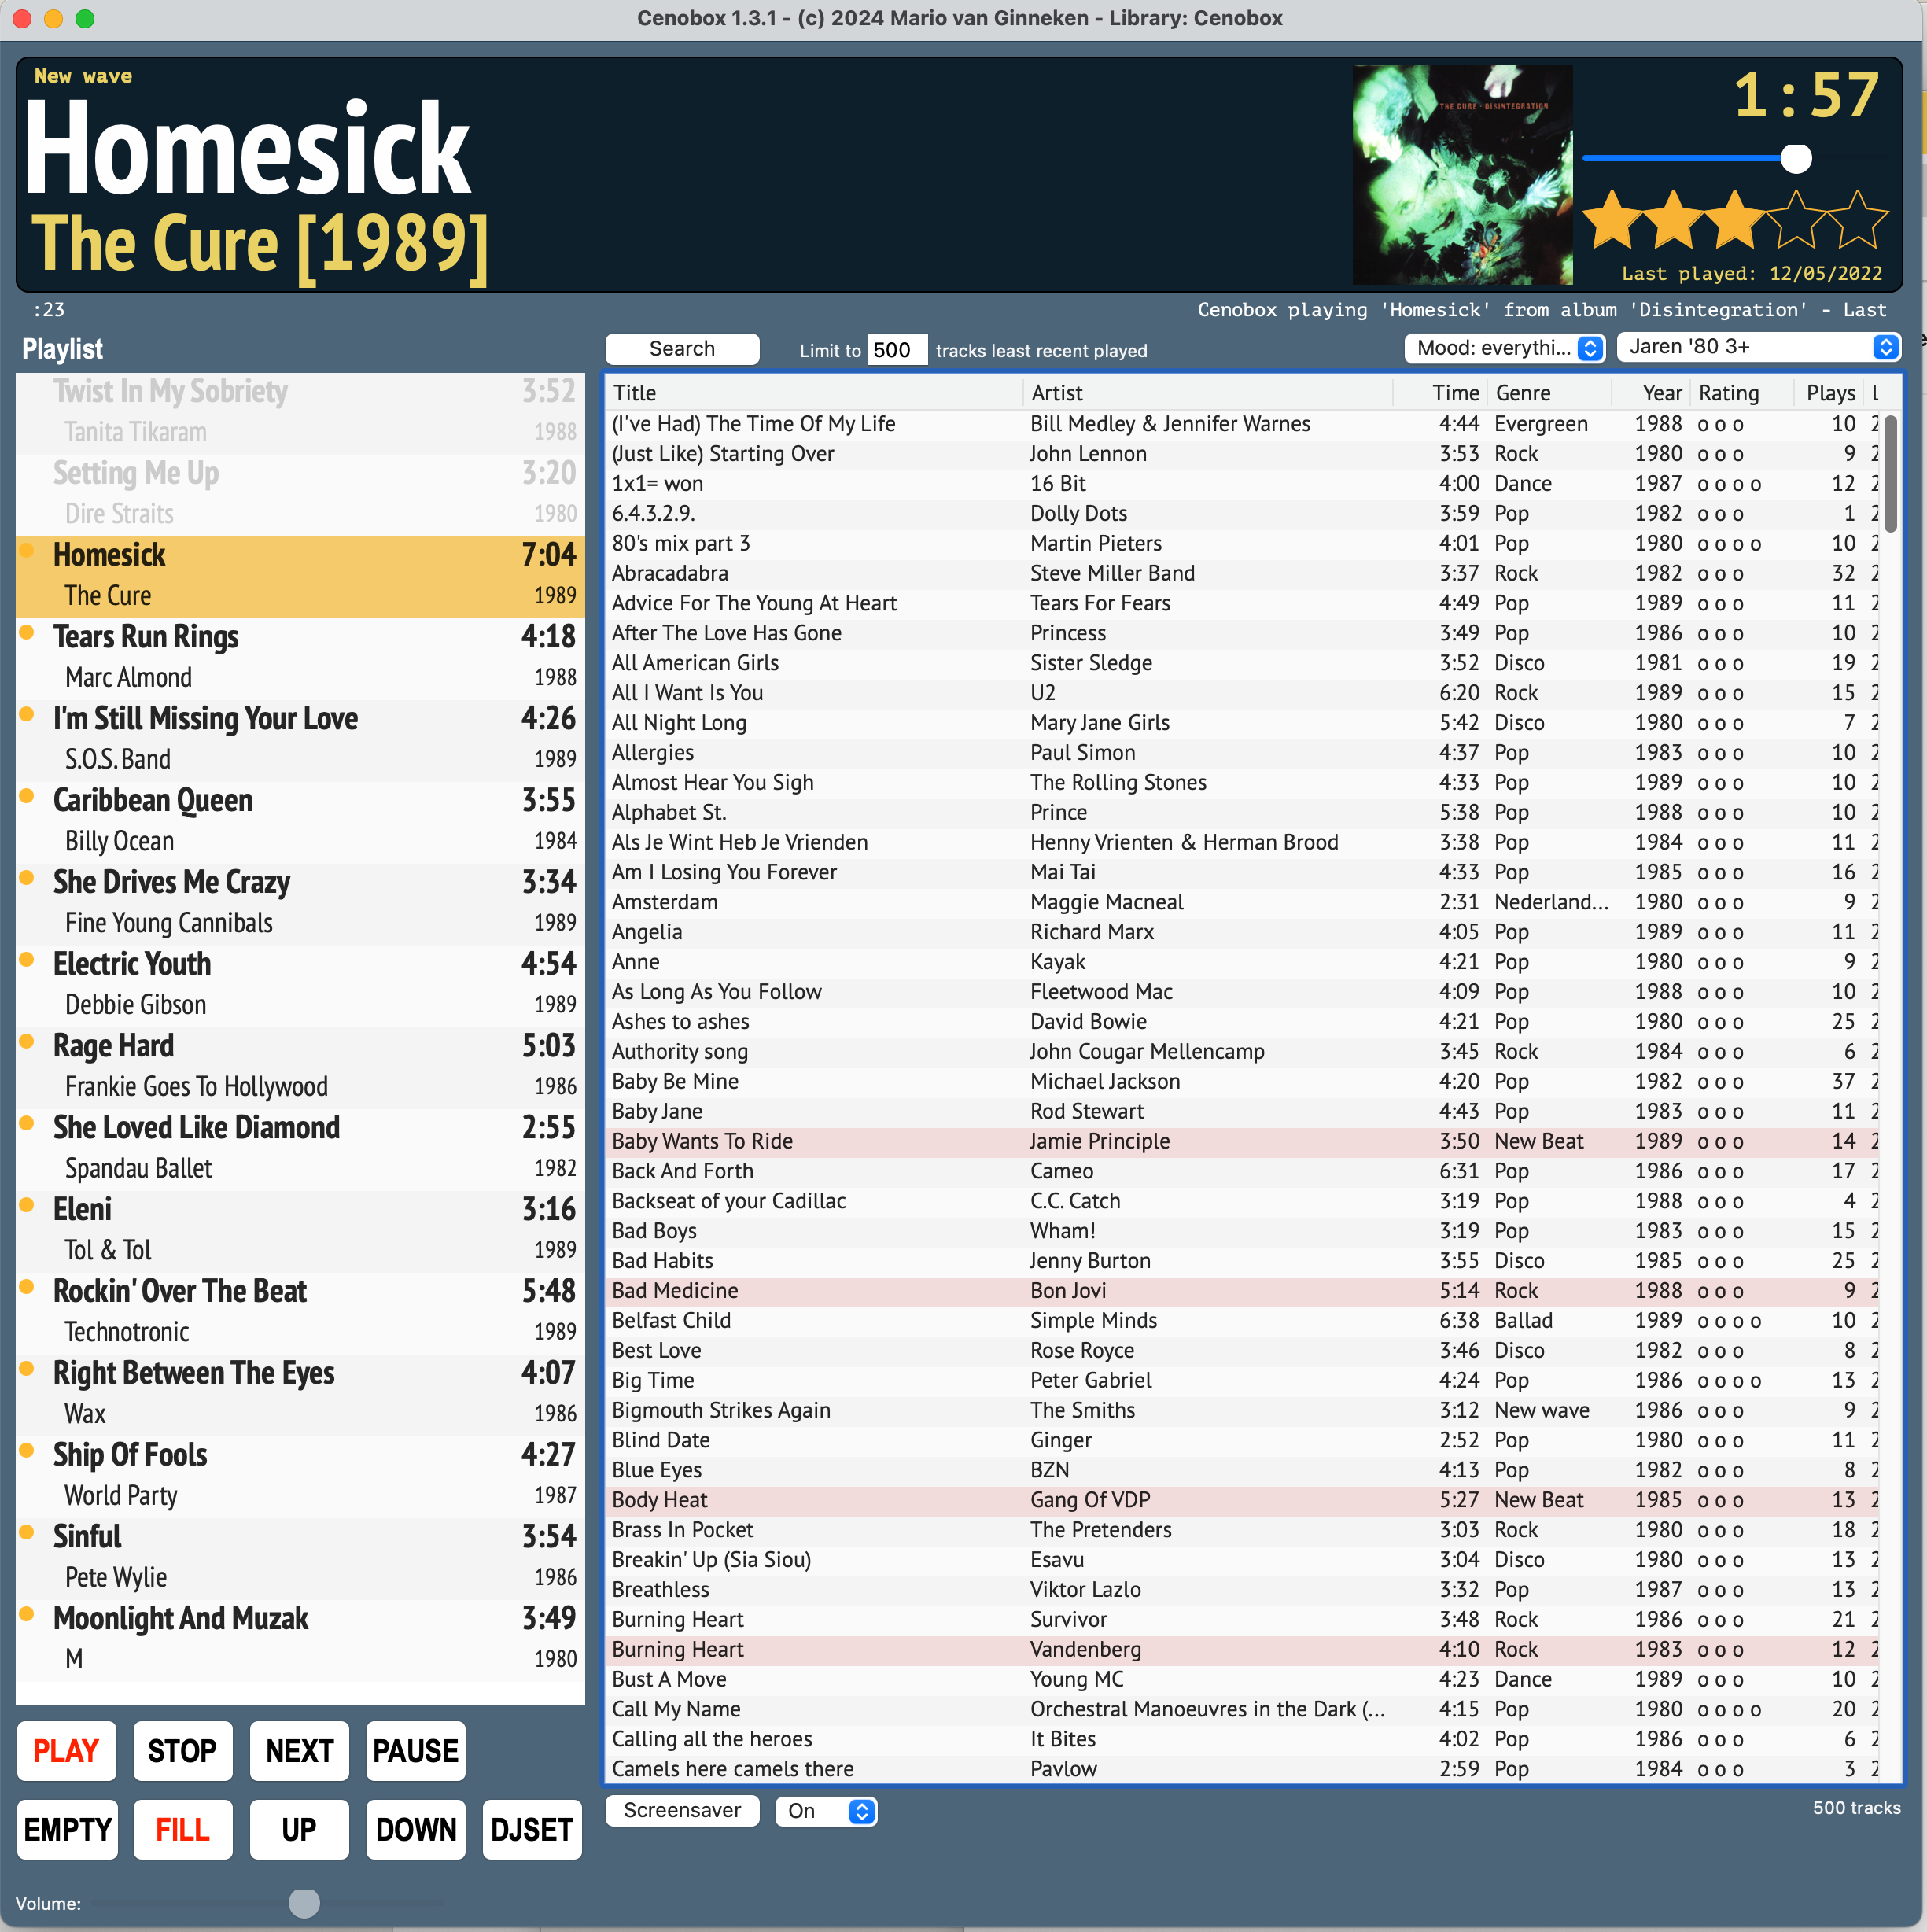
This is the main screen of Cenobox. On the left is the Playlist showing upcoming tracks. You can rearrange tracks or double click tracks so they pop to the top of the list. The software keeps your Playlist filled and randomly chooses the tracks from the list on the right side: the Selection List. This can be your complete collection or a live updated list based on selection criteria you specify, like “Genre contains Country” or “Year < 1980” or “Remarks contain Marion Favorites” or “Mood = relaxed”. Of course you can also use a combination of these criteria. When creating a Selection List it’s always wise to set a Limit. If you set a limit of 500 tracks, these will be the 500 tracks with the oldest Play Date. This way you will never hear tracks repeatedly, unless you choose to.
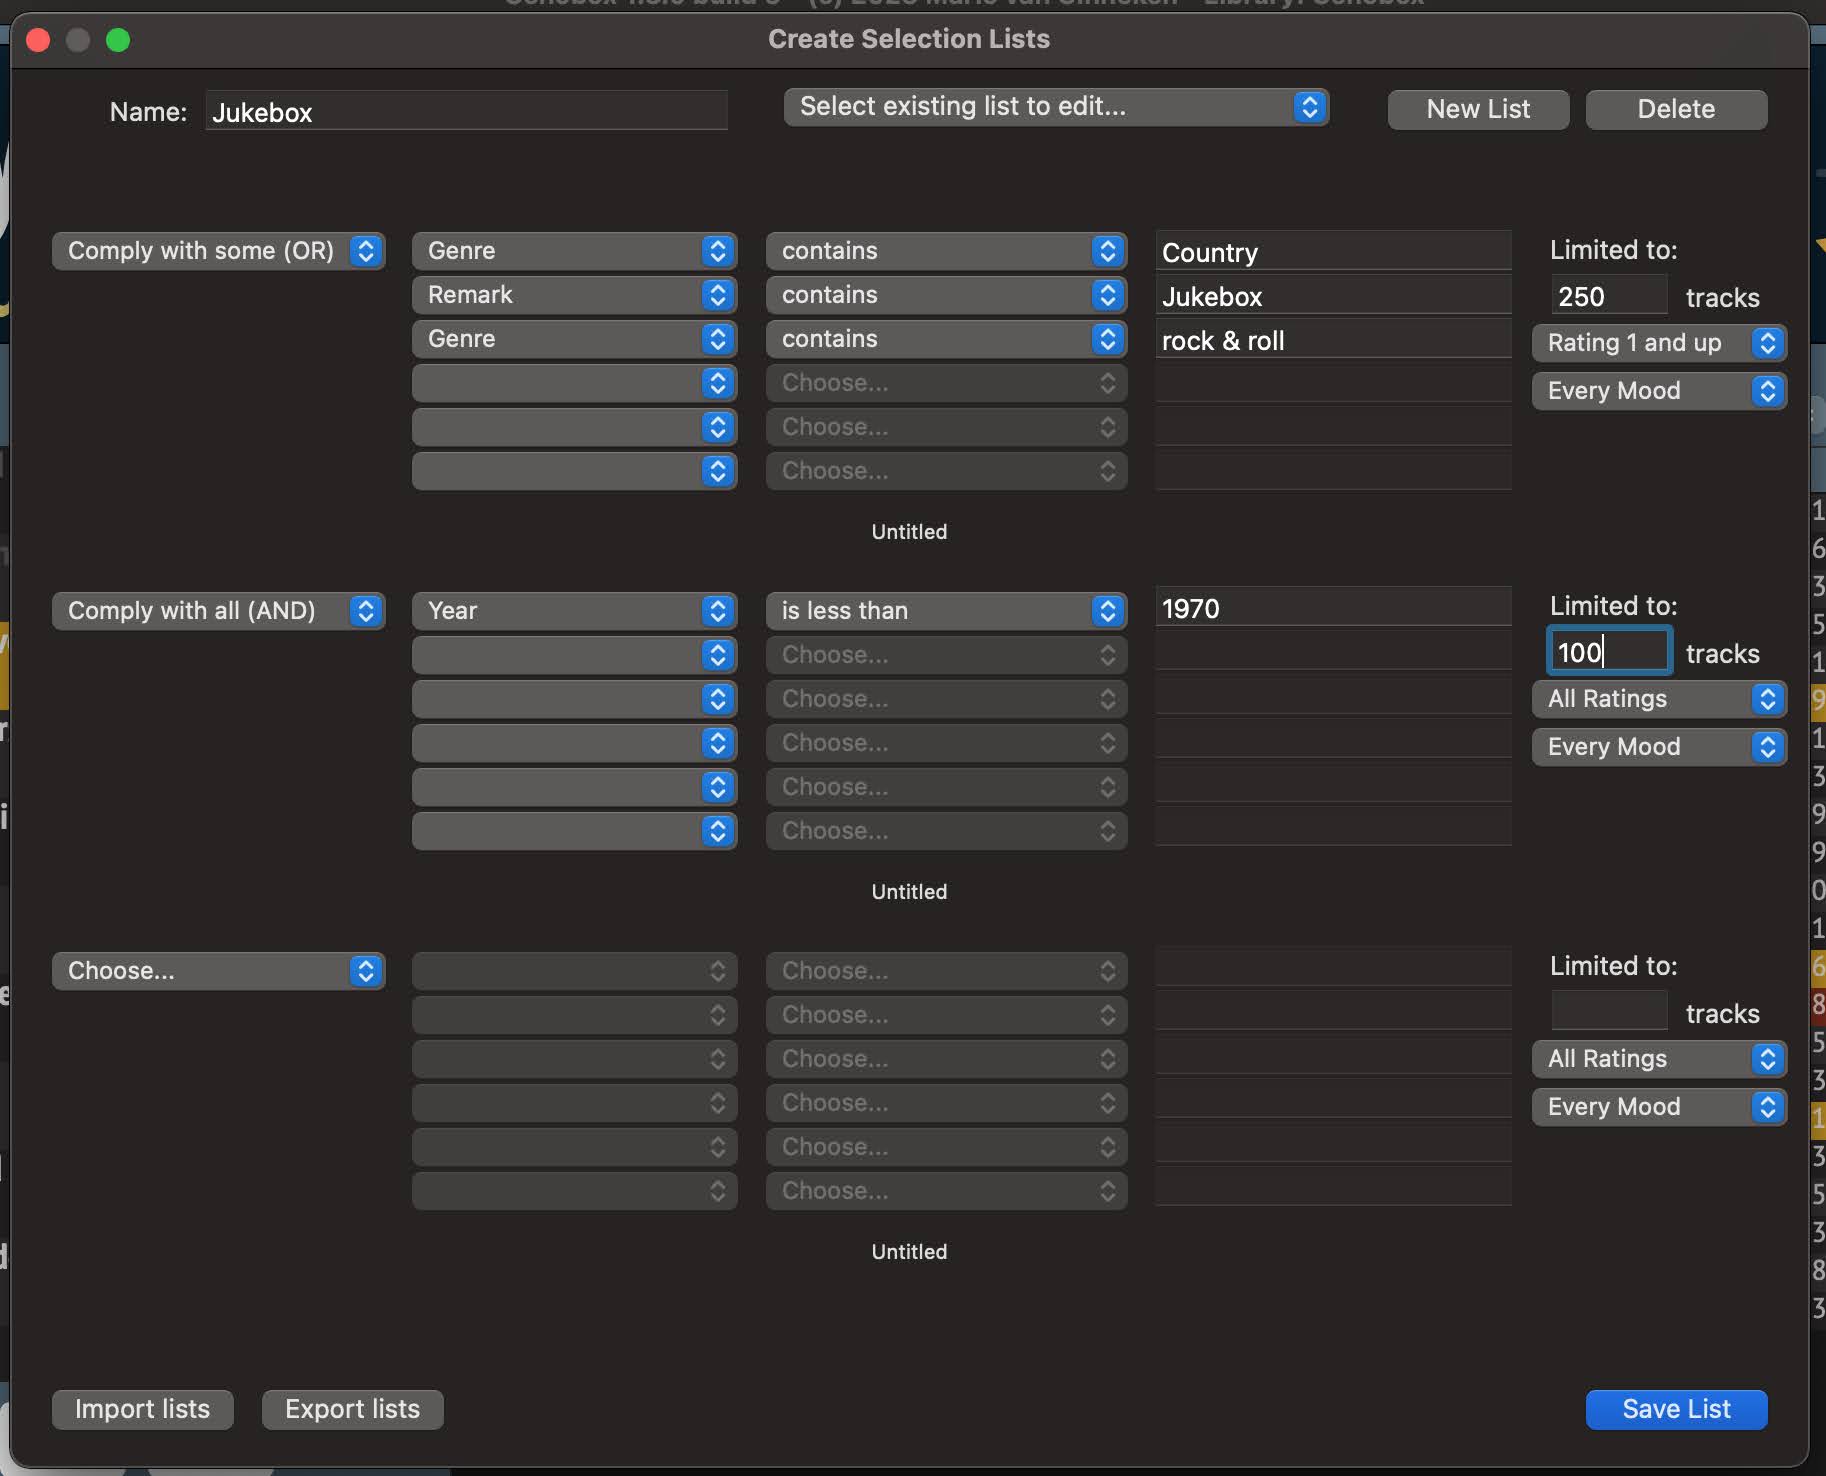

Creating a Selection List named “Jukebox”. You can see that you can set up three selection filters, each with their own limit and up to six filter criteria. This Selection List results in a total of 350 tracks (unless there are tracks that fall under both filter criteria).
Here is a very short presentation movie of Cenobox. For the first part the music is stripped from the film because of Youtube’s handling of music rights.
Here are some examples of the screensaver, pictures and title strip are slowly moving in opposite direction to prevent burn in on your screen:
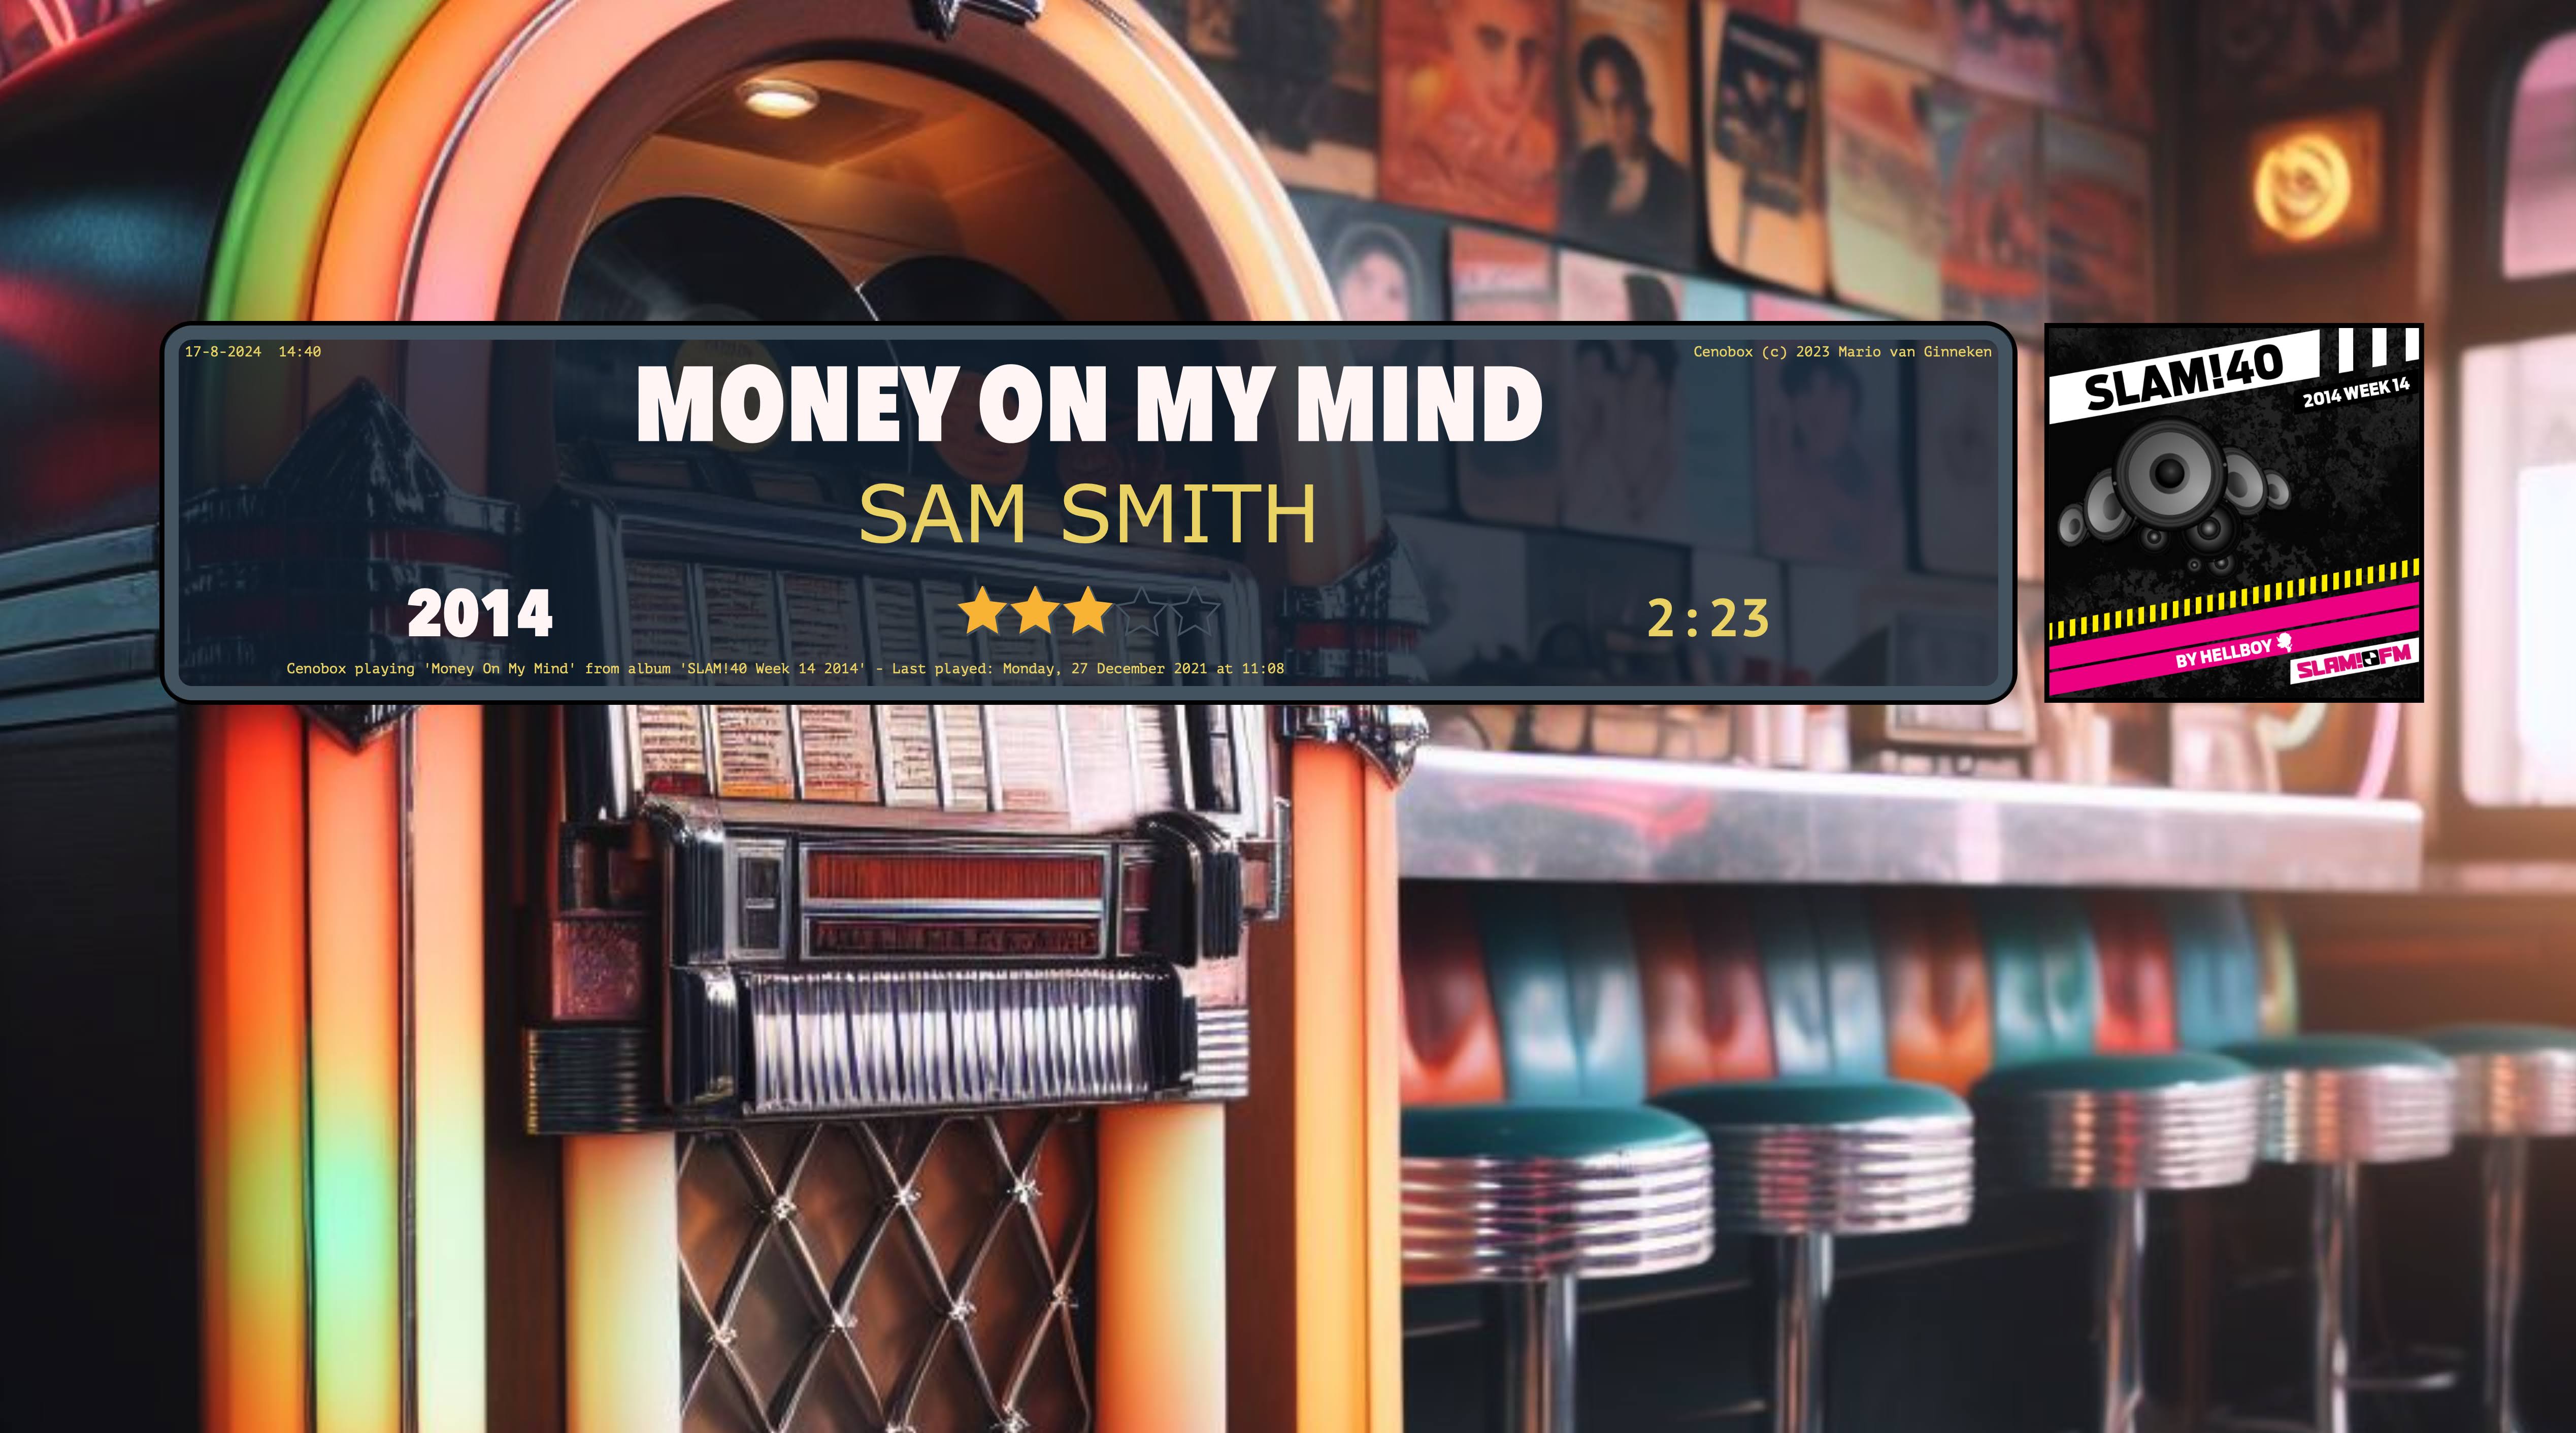
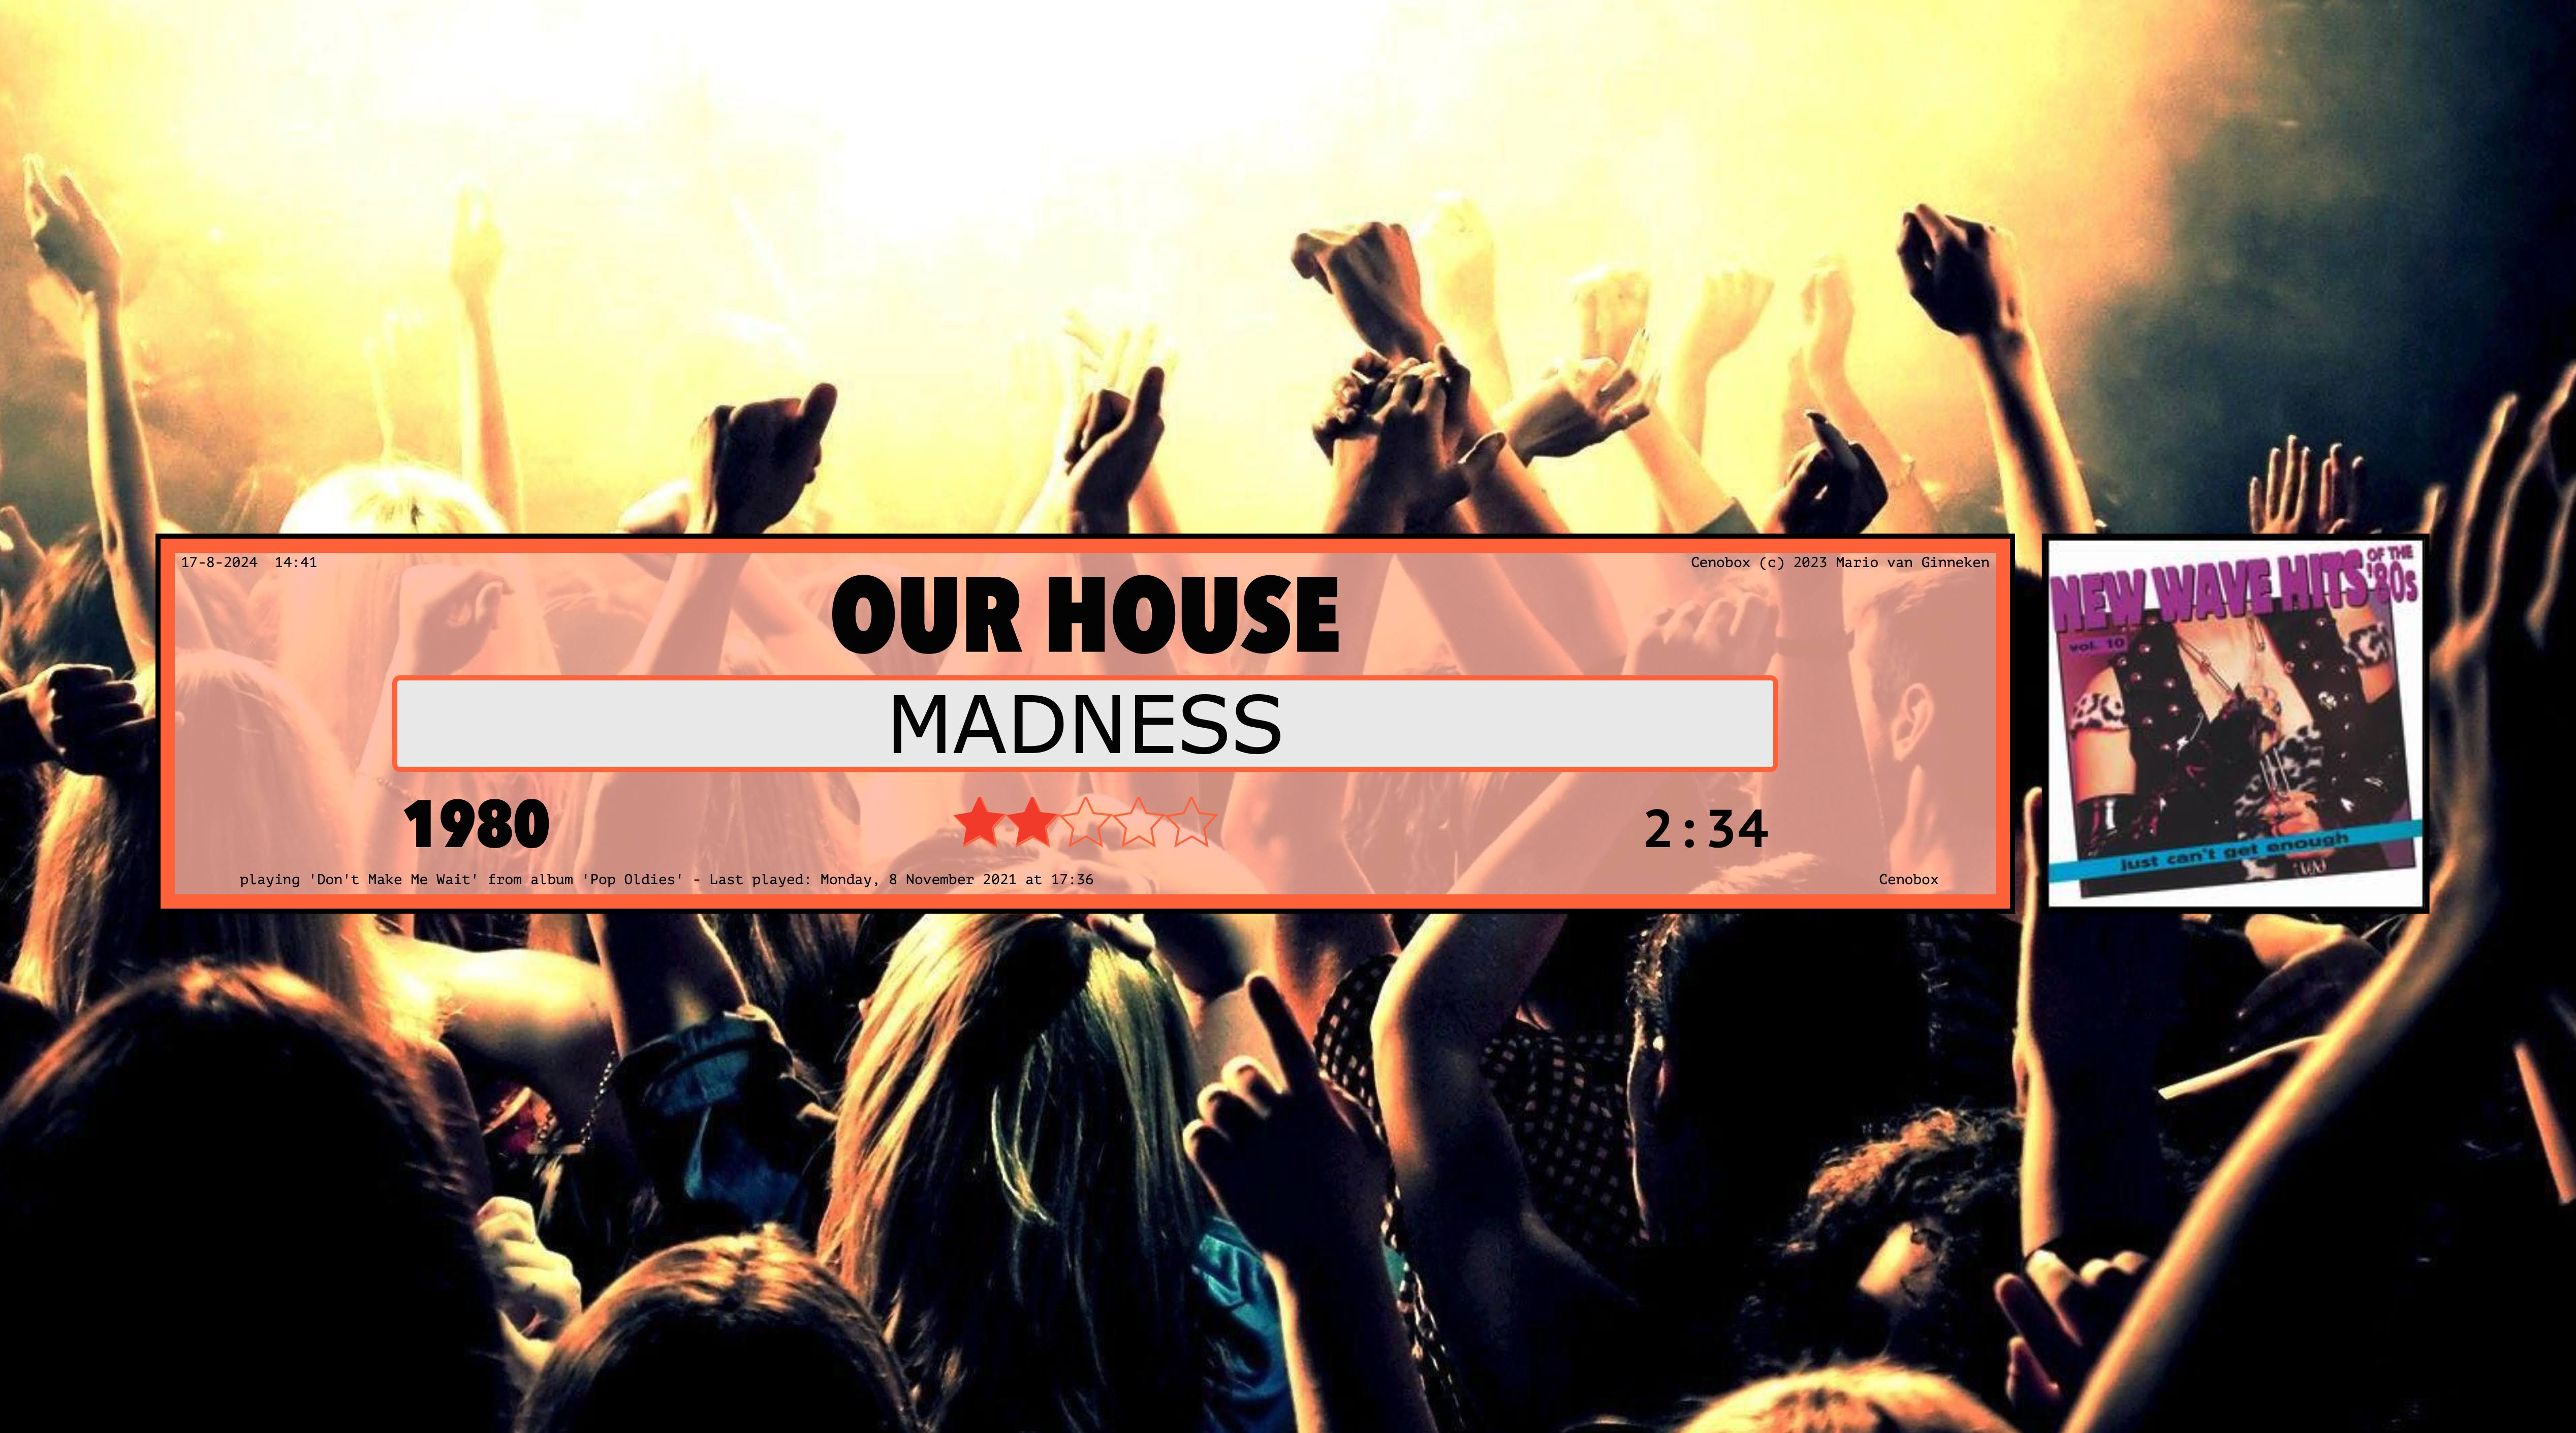


The screensaver starts when Cenobox is left playing for a minute or so and if Cenobox stays in focus. As soon as you select another program on your computer while Cenobox is playing in the background, the screensaver will not start, so you can work while listening to your music.
If the screensaver is active, you can exit by using the Escape key. You can also use short keys to skip a track or change the Rating or Mood of a track without exiting the screensaver.
The shown background pictures are not included in the download. If you want these, download them through the link below (after clicking the link, choose the download icon on the top of the page, with the downward arrow).
Link to background pictures
Ratings & Moods
Just like iTunes/Apple Music, Cenobox has a five star rating for your songs. Besides that, you can also give each song a “mood” rating: Relaxed, Neutral or In Your Face. This allows you to play music that suits your mood. Like to listen to some Rock or House? Or maybe want to relax after a busy day with some mellow music and block out these “noisy” songs?
Synchronizing music and ratings with other computers
Synchronizing allows you to create and maintain a copy of your music collection on another computer. Cenobox offers multiple ways to do this.
Synchronize songs copies the files that were added to Cenobox after the last synchronization. It creates a folder with these songs and adds an extra file with the database info, so all ratings, moods, genre, etc. are also synchronized.
Cloning is a brute force way to sync. It creates and maintains a copy on an external drive or a NAS, which will copy all music files and your database file. A second Cenobox can run from this external drive or you can use this as a backup. Every time you run the Clone routine again, only the new files and the database file are copied, so changes on the Cloned database will be overwritten.
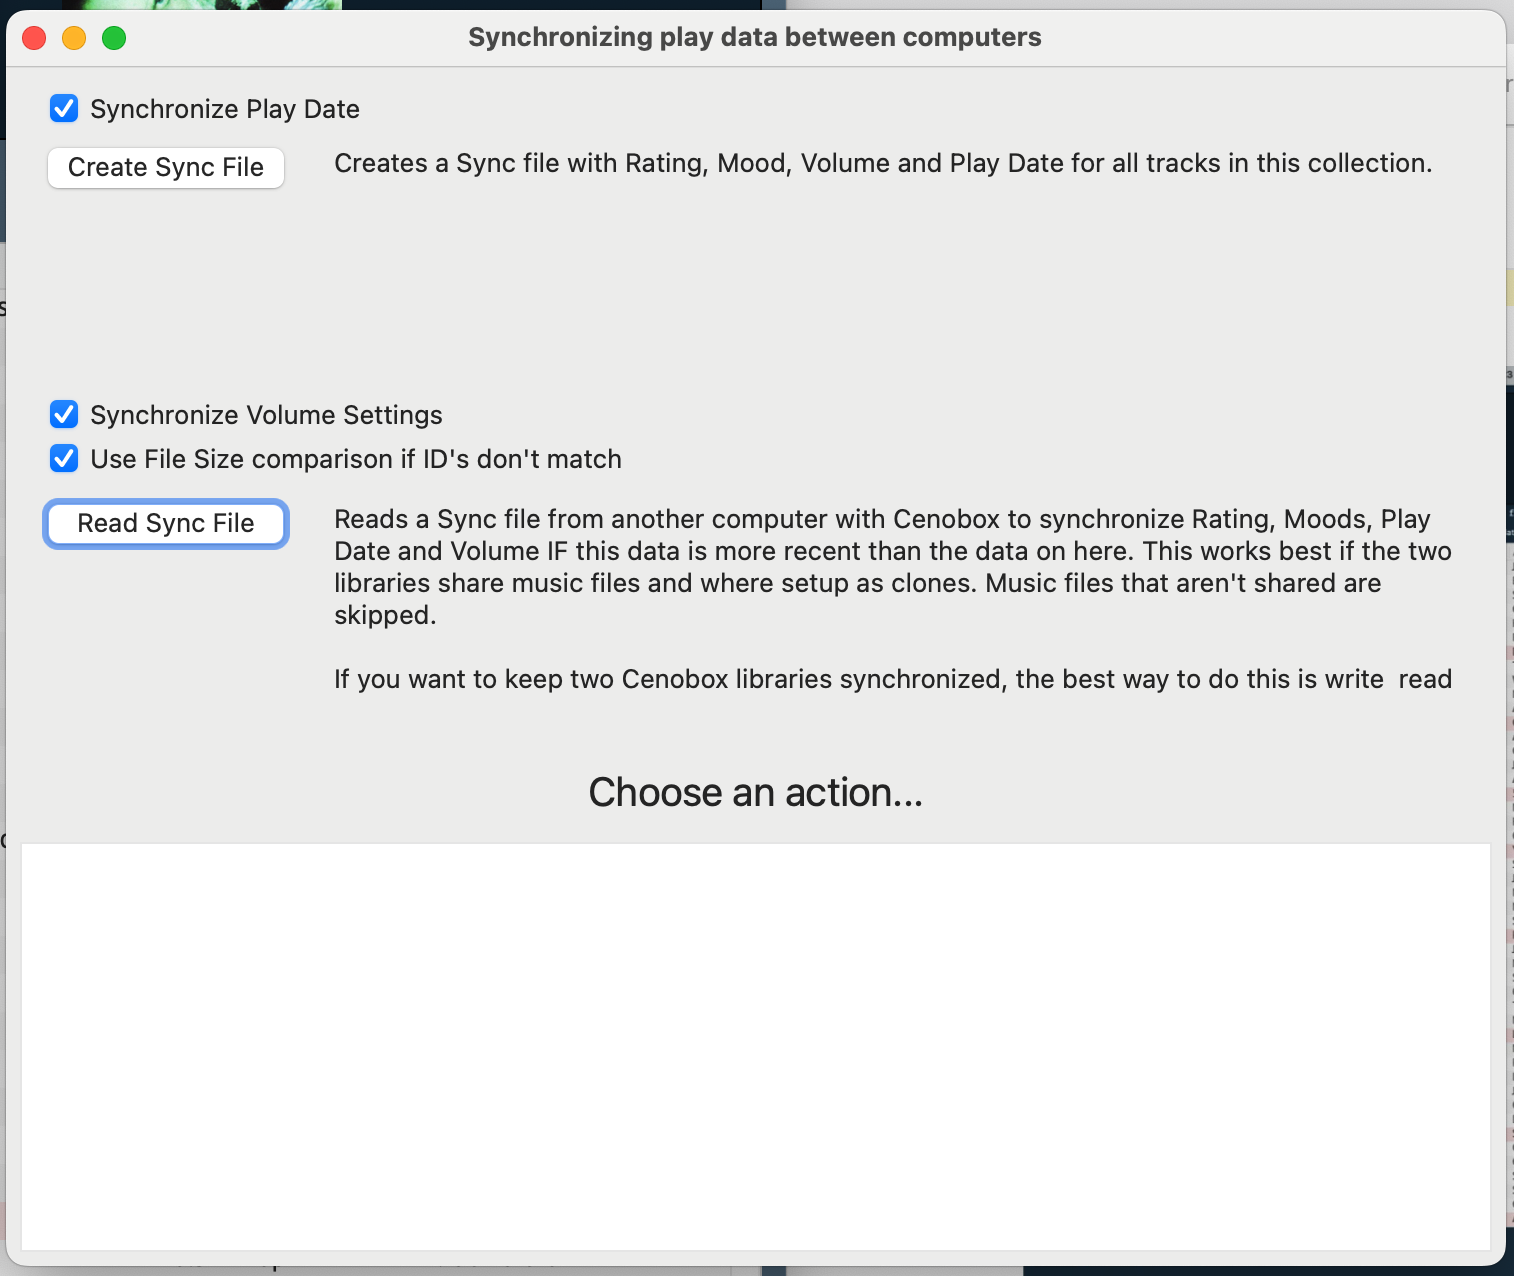
Synchronize Ratings copies the database settings, like ratings, mood, volume, etc. Cenobox creates a small text file containing this data and you can read it on another computer with a similar library and this data will be synced.
Scan & Rate mode
Sometimes you just want to skip through some music, check the Ratings and Mood of some tracks or listen if volumes are good. Scan & Rate mode plays music without mixing and every song is started 40 seconds from the beginning, so long intro’s are skipped and you’re right into the song. Also Play Count and Date are not updated, so it’s not interfering with your listening experience later on.
Make a “Cassette Tape”
This feature is used to create a folder with music, based on a Selection List. You can copy the folder to a USB stick or SD card and use it on an external device or copy the folder to your smartphone.
Questions? Mail me at cenobytez@gmail.com.
How Cenobox got created
Cenobox was created out of frustration with the iTunes/Apple Music software, which I used from 2005 to 2023 to manage and play my ever evolving music collection. The software became too bloated when iTunes changed to Apple Music and I missed the "iTunes DJ" that used to be in the software: a list of songs that where coming up next and was running on a Smart Playlist. I started fantasizing about all the things I might want in such a piece of software and before I knew it, I had a list of Must Haves and started to work on the software (with working title "Cenojuke").

Inspiration came from iTunes, music software used in bars and from the jukebox scene. I liked the concept of Jukebox title strips and wanted those as part of a screensaver when Cenobox was playing music. It should also be easy to search for music in your library and add it to the Play List and shuffle songs in there without disrupting the constant flow of music playing. I wanted music being seamlessly mixed, also when you manually skip a song halfway and I wanted everything idiot proof.

Mario van Ginneken
Cenobyte
THE MANUAL
Download Cenobox
>> Cenobox Mac Intel 64 bit & Apple Silicon version <<
Click on the link and when Dropbox opens, choose the Download icon on the top of the page (arrow down). Unzip the file and copy the version of Cenobox you need to your Apps or Programs folder. You can choose between the 64 bit Intel version and the Apple Silicon version. If you’re updating a previous version: you can override all files with the downloaded ones, al data and settings are safely stored elsewhere.
When a message appears: “Cenobox can’t be opened because it is from an unidentified developer.”, press OK and right-click the program and choose “Open”. You will get another pop-up stating that “macOS cannot verify the developer of Cenobox. Are you sure you want to open it?”. Click Open. The program will run and this message wil not be shown again (until you do an update: then repeat the same procedure).
You will get a message “Path to music not found…”, click OK
Now you have two options: 1. start from scratch with a new music library or 2. import your iTunes/Apple Music library.
When you want to start from scratch, NOT from iTunes or Apple Music
- The settings screen will open in the Libraries tab. Change nothing, just click Save
- Cenobox responds with “New database created!”. Click OK.
- The main screen opens, you will see the music library is empty. Go to the pull down menu, choose: Import/export -> Add music to Cenobox. Two windows will open: “Search for tracks” and “Add Music to Cenobox”. Click on the second window and choose “Select Music Files.
- A file dialog opens. Find some music files to add and select them. You can use the Shift and CMD keys to select multiple files at once. When you have selected a couple of files, click the “Select Music Files” button.
- You’ll get back in the “Add music to Cenobox” window. Drag the window a bit wider and you will see more columns with info appear.
- Click on the first track. On the right you will see all info on this track. You can edit this info and store your changes by typing “ENTER”. Select a Rating higher than 0 to be able to move or copy the track. The volume will be set to 90, unless you have installed the ffmpeg software (*). The button “Rpt” will repeat the value in front of it for all the tracks below the selected track where there’s not data. The “FRpt” will do the same, but will also overwrite the existing data. All this data can be edited at a later stage too. Choose “Copy…” if you want to copy this file to your Cenobox folder and leave the original file intact. Choose “Move…” if you want to copy the file and erase the original. Choose “Delete mp3” if you don’t want to copy the track, but do want to delete the original. If you want to do nothing, you can select the next track in the list by clicking on it.
- When you’re ready checking all tracks and selecting the tracks you want to add to your library, click on “Process all songs” below the list. After processing the files Cenobox will reply with “x files selected: x files added and x database records”. In the listbox, the tracks you had marked for copy, move or delete will be gone. Close the “Add music to Cenobox” screen and return to the Main screen.
- Press play on the main screen. Cenobox will start playing your music.
When you want to start with an iTunes/Apple Music library
Cenobox will not change anything to your iTunes/Apple Music library or settings, so you can mess around here without risking your music library! Your music files will stay in the same place and all song data in your iTunes will be imported including your Star Ratings. No files are copied, so no extra space is needed.
- The settings screen will open in the Libraries tab.
- Check where iTunes/Apple Music stores your music files. This should be a folder where you can see subfolders with artists names. Often this is (somewhere in) the Music folder in your user account. Give your Library 1 the name “iTunes” and click on the button “Select path” behind the empty Path: textfield. Select the path where your music files are.
- Click Save. Cenobox responds with “New database created!”. Click OK.
- Choose the pull down menu: Maintenance -> Settings and go to Libraries. At “Active library” choose iTunes. Click Save and quit Cenobox.
- Open iTunes or Apple Music. Choose from pull down menu: Archive -> Library -> Export library. Save it in the Downloads folder.
- Restart Cenobox. Because you’ve selected another library, the program responds with “New database created!”. Click OK.
- Choose from pull down menu: Import/Export -> Import iTunes/Music library. The library is imported.
- Sometimes the program asks ‘There are x records in the database that aren’t in…”. Click Yes.
- Close the “Import from iTunes/Apple Music database” screen.
- In the main screen you will see the tracks you just imported. If not, click on the pull down menu on the top right and choose “All tracks”.
- Press play on the main screen. Cenobox will start playing your music.
- IF you want to exclusively use Cenobox from here and abandon iTunes/Apple Music, it’s possible to do that. You can also keep working/adding/editing in the Apple software and only use Cenobox as player, but then you will need to repeat this import routine whenever you make changes to your library and do not make changes in Cenobox, because they will be overwritten with this Import routine.
Fix Paths
Some users report that after the import, all music is in the database, but tracks fail to play. This is due to an alternative way some Apple Music libraries have stored the paths to the songs and Cenobox has imported these non-working paths. To fix this, follow the next procedure.
- Right-click on a non-working song and choose “Edit track(s)”
- If this track is not playing, there will be a button “Fix Path”, click it.
- A screen will open and you will see 4 lines.
The top line is the path where your folder is that holds all your music files. This path will normally start with “/Users/yourname/music/…” and is an absolute path.
The second line is the path to the music file, starting from the path to the library (therefore called a relative path). This path should not be starting with “/Users/…” or “File:///”, but will look something like: “wham!/the%20final/bad%20boys.flac”. Cenobox adds “Path to Library” and “Path to music file” together, forming the complete path to the music file. By using the line “Cut from path” you will cut off the first part of the “Path to music”, until both paths form the correct path to you music file. - With the button “Try to load file” you can test if the path is correct: if it is, the song will load and play.
- After that, don’t forget to store your fix! You can choose “Fix file path” to fix the path of this one file, or you can make the same change to all your music files by choosing “Fix all tracks!”.
Demo mode
When you install the software, it’s in demo mode. This means you can test it for as long as you wish, the only limitation is that it stops playing after 10 songs. It pauses and gives you a nag screen, and you can close that and start playback again for 10 songs, etc.
If you want the full version, contact me at cenobytez@gmail.com with your name and I can send you a registration code. The fully working version of the software is €15,- for unlimited use. You can also download all future updates and bugfixes for version 1.x.
Installing ffmpeg for volume checking
With the free ffmpeg software Cenobox can automatically correct the volume of your tracks, so all tracks play on a similar volume level. This correction is achieved by changing the volume in Cenobox, so it does NOT change your music files. Louder files are played on lower volume and softer files on a higher volume.
- To download the ffmpeg freeware go to the website https://www.ffmpeg.org
- Click Download and choose the compiled download under “Get packages & executables”.
- Click on static builds for macOS 64-bit
- Choose Download as ZIP and extract the ZIP file, you will get a file called ffmpeg
- Open your Home folder by opening Finder and using the keyboard shortcut CMD + Shift + H, or clicking the Go button on the menu bar and clicking Home.
- Create a New folder and rename it to ffmpeg.
- Open the new ffmpeg folder and create a new folder in it labeled bin.
- Move the FFmpeg file from Downloads to the newly created bin folder.
- Double-click to open the FFmpeg file. When the “ffmpeg can’t be opened because it is from an unidentified developer.” message appears, press OK, right-click the program and choose Open. You will get another pop-up stating that “macOS cannot verify the developer of “ffmpeg”. Are you sure you want to open it?”. Click Open.
- A new Terminal window will open, running a process that will take a few minutes max. Close it only when the process is complete. After completing you have successfully installed ffmpeg.
- Open Cenobox: go to pull down menu: Maintenance -> Settings and click in the Settings screen on PRO Settings.
- You will need to enter the ffmpeg full path. Click “Auto” if you followed the instructions above, or type in the path yourself if you installed ffmpeg elsewhere.
- Go back to the Settings tab and click on Save.
- To test, go to the main screen and click on a song with the right mouse button. Choose “Edit this track”. A screen will open that shows all info on this track. Click on the “ffmpeg” button. If a popup shows “Volume recalculated” you have successfully installed ffmpeg. From now on, all the music files you add will have their volume automatically adjusted.
Adding music files
- In your pull down menu, choose Import/Export -> Add Music to Cenobox
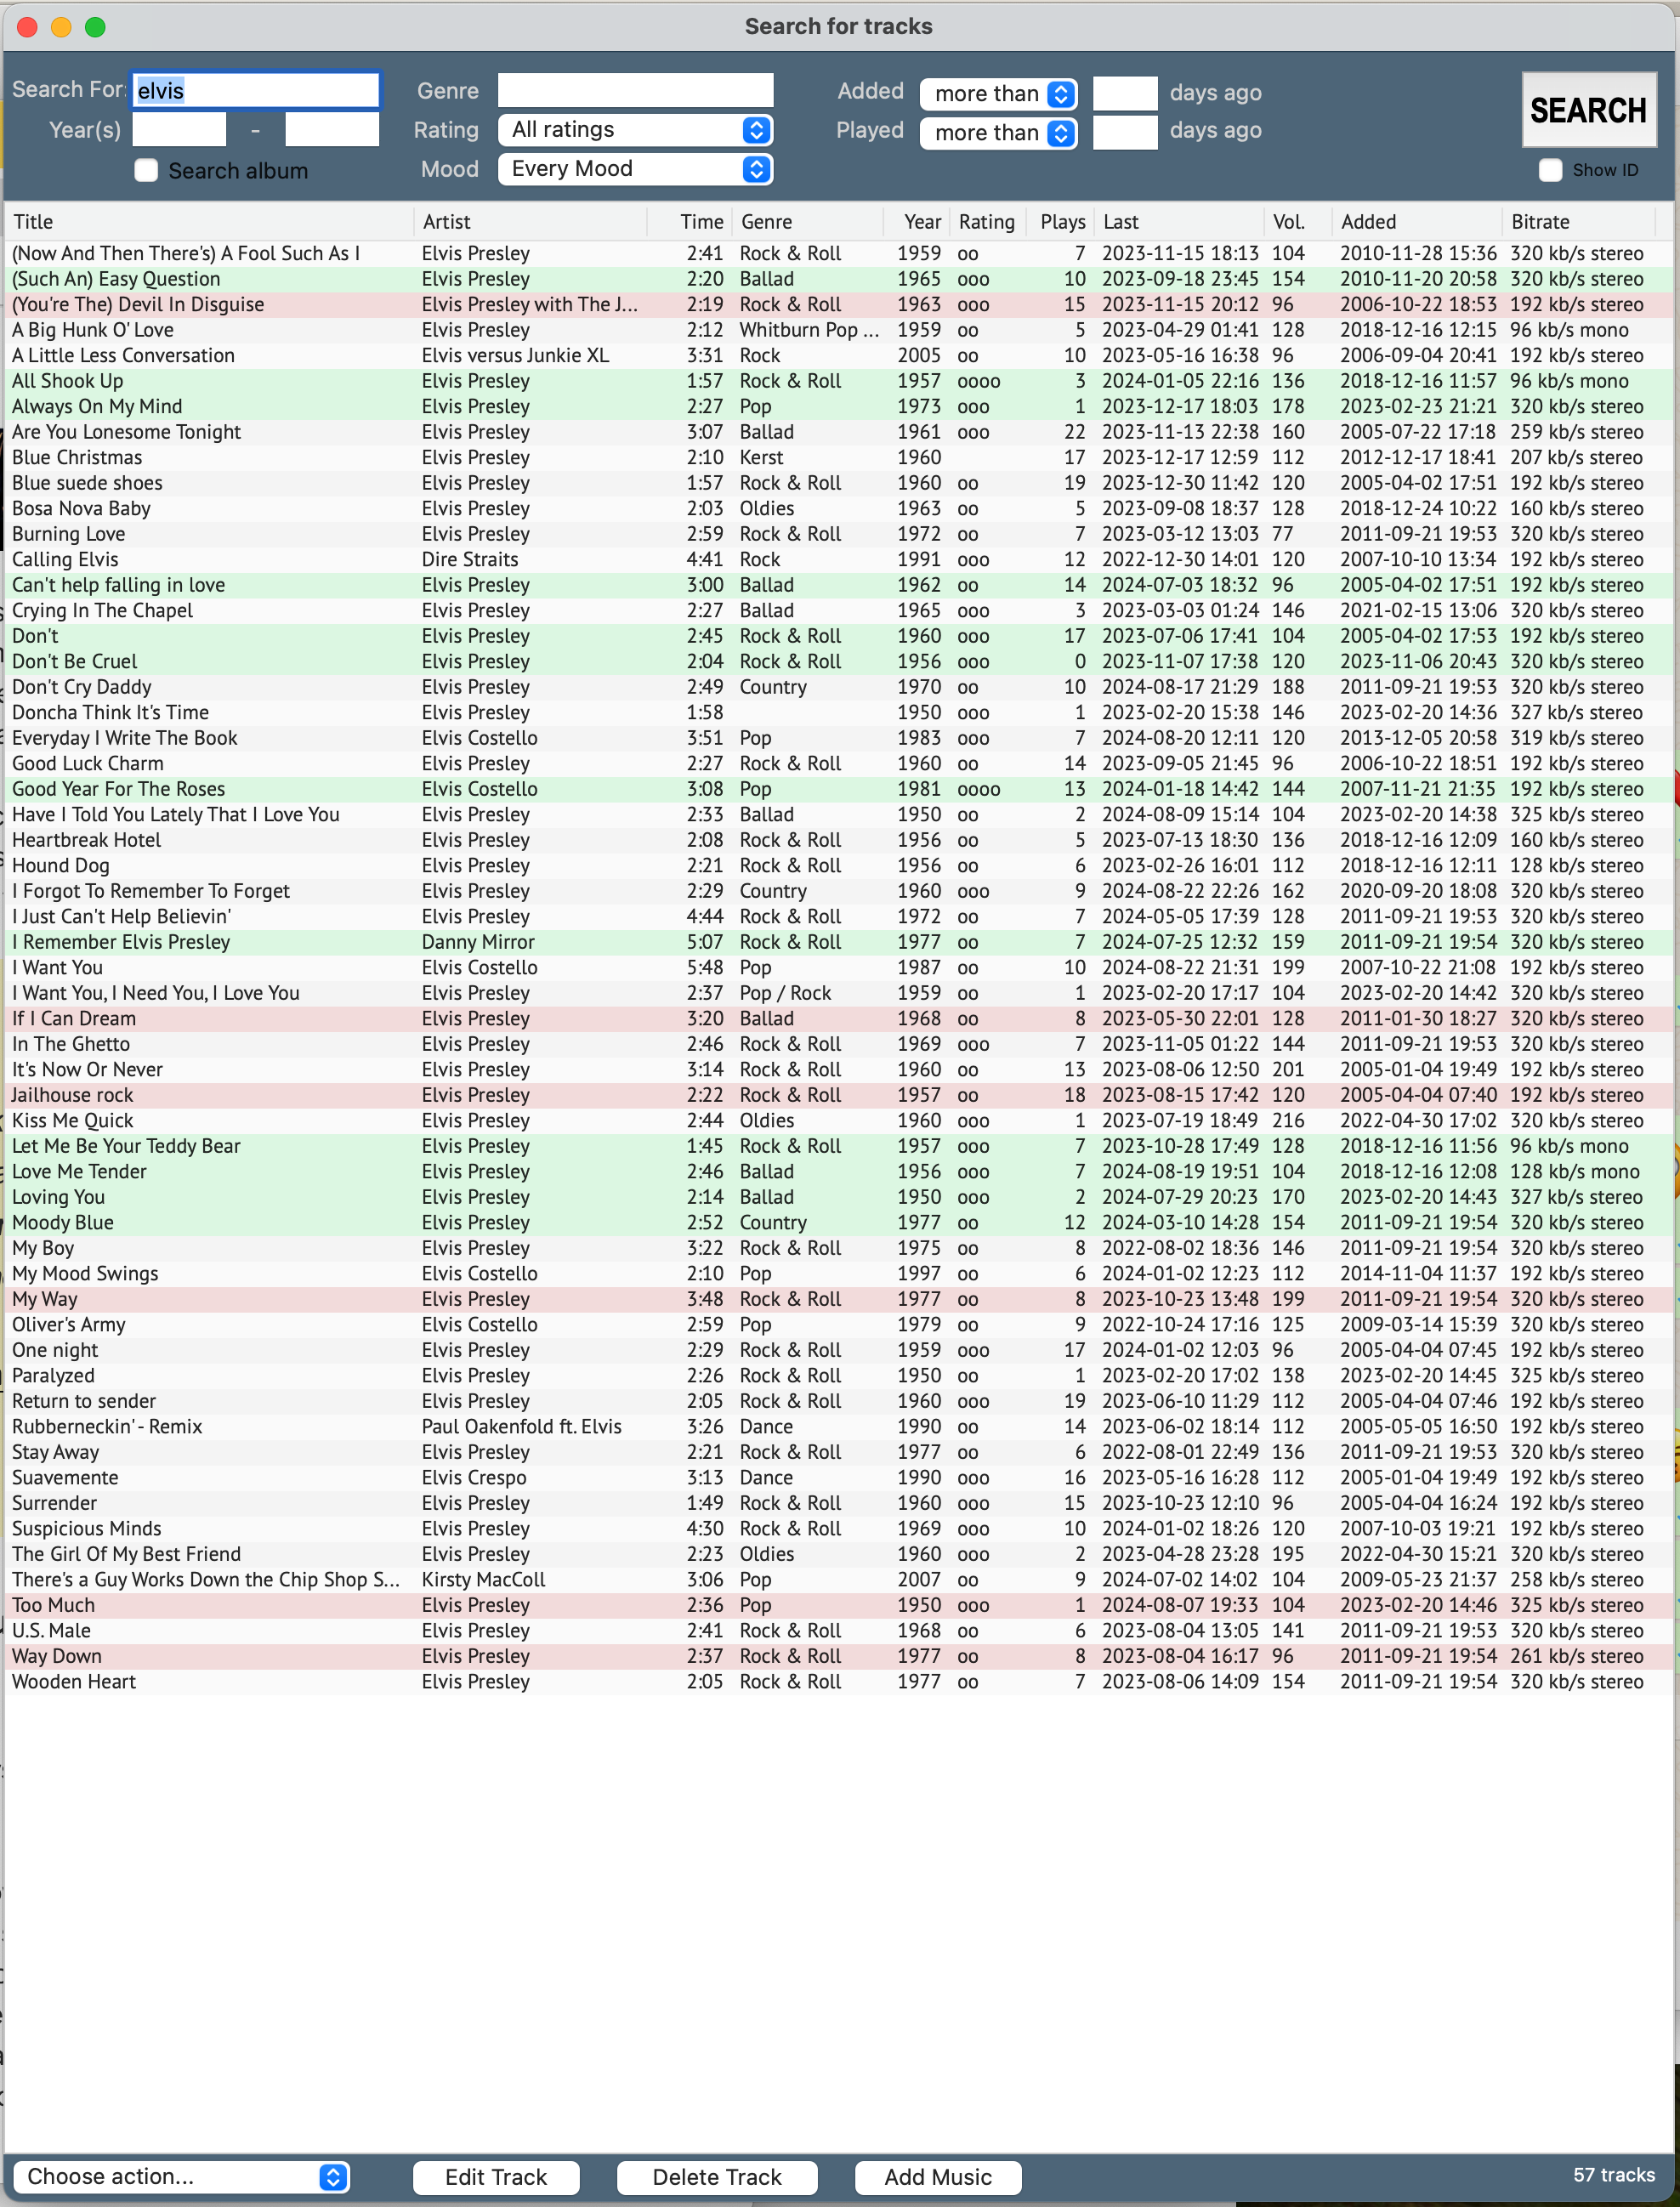
- Two windows will open: “Add music to Cenobox” and the “Search for tracks” window. Position the windows next to each other, resizing the first window if necessary.
- In “Add music to Cenobox” click on the button “Select Music Files”. A file selection window opens.
- Select music files. Using the command or shift keys, you can select multiple files.
- Click “Select music files”. The music files will appear in the “Add music…” window.
- Select the first file. It will start playing the file, calculate the volume if you have installed ffmpeg and shows you the info on the right.
- Look at the “Search for tracks” window: it shows you all the tracks in your library based on the artist of the track you just selected, so you can see if you have this track in your library already and if you do, you can compare quality, bit rate, etc. vy right clicking on the file and choose “Edit track(s)”.
- If you want to add the track, you can change the info and I recommend you check/change/add genre, year, rating and mood to help you create selection lists in the future based on these tags.
- You must select a rating higher than 0 to add the track to your library.
- Now select “MOVE file to library” if you want to add this track to your library and remove it from the original location, or select “COPY file to library” if you want to keep the file on the original location. Click “DELETE file” if you don’t want to add the track, but want to delete it from it’s original location.
- Cenobox will select the next music file. You can repeat this procedure for all selected files.
- If you’re finished, click “Process all files” to execute the MOVE, COPY and DELETE commands you’ve assigned to the files. If there are files you did not assign a command to, they will remain in the list.
Playing music
TIP: Turn off sound effects from your user interface: go to your Mac Sound settings and turn off “Play user interface sound effects” and “Play feedback when volume is changed”.
When tracks are present in your Playlist (left) you can click the PLAY button below it. Cenobox will keep your playlist filled as long as the FILL button is red (you can switch it off). STOP ends the music and PAUSE will insert a STOP command behind the song playing or behind songs you have manually added.
You can move songs (and the PAUSE command) up by dubbel clicking on it. With EMPTY you will remove all songs in the Playlist, to also move your manually added songs, double click the EMPTY button.
To Rate your playing song from 0 to 5 stars, use the pull down menu “Player” or the shortcuts mentioned in that pull down menu. The same goes for Mood: you can designate a song with three Moods: Relaxed (green stars), Middle of the road (yellow) or In Your Face (red). All shortcuts also work when your screensaver is active. To exit the screensaver, press the ESC key. In the Settings screen (pull down menu Maintenance -> Settings) you can set the amount of seconds Cenobox waits to start the screensaver. You can select “Off” next to the Screensaver button below the Library list to turn the automatic start of the screensaver off if you’re doing some work in Cenobox and don’t want to be disturbed by the screensaver.
Adding your own pictures for the screensaver
- Choose Maintenance -> Settings from the pull down menu.
- Click on “Application Folder” in the bottom left corner.
- A folder will open and you’ll see a subfolder named “ScreensaverBackground”. Add your JPG/JPEG formatted pictures here.
- Restart Cenobox (the program loads the backgrounds into memory when starting up).
Selection Lists
The Selection Lists will help you play music you want to hear. You can make your own lists based on title, artist, year, rating, mood, genre, words in the remarks, etc. To play a specific selection list, click on “All tracks” in the top of the main screen, just above the Library. It’s a pull down button that will have all the Selection Lists you create in Cenobox (at first, it will only have “All tracks”). To create a Selection List, do the following:
- From the pull down menu, choose Maintenance -> Selection Lists
- A new screen “Create Selection Lists” appears. Here you can select existing lists or make new lists. Click on “New List”
- Behind “Name” write the best description you can give, like “80’s”, “Country”, “Disco & Soul” or “Maggies Favorites”.
- On the left, click on the top “Choose…” pull down menu. Now you can choose if your next selections must all be met or just some/one of them.
- In the next row starting at the top, choose a field to filter on.
- In the next row, choose an equation to execute on this field.
- In the next row, type the data you want to compare. This field is not case sensitive.
- You can add more search criteria on the next five rows.
- On the right of your search criteria, you can limit your search to a specific number of tracks. Cenobox will make this selection by choosing the tracks that were played the longest time ago.
- You can make a total of 3 sets of search criteria, each with their own limits, so you can balance each result by giving them a higher or lower limit than the other.
- Each set of search criteria can have their own ratings and mood setting.
- As soon as you choose “Save List”, your Selection list will be saved and the main screen will change the Library window to your last edited Selection List.
This manual is a work in progress… More to come!
For questions you can mail me at cenobytez@gmail.com


